The first thing we're going to do is plug in the Kinect and try out the Processing code to get and display images from the Kinect.
Plug in the Kinect, you should be able to see a yellow/green light. If the light does not appear, that means there is communication error and you’ll need to re-plug the Kinect.
Heads up! As the Processing version has been upgraded to 3.3.6 the processing code has more glitches than ever. Once you run your code, if a blank or black screen appears, Don’t panic. Just restart the Processing application and try executing the code again.
Step 1: Open Processing> Go to Sketch> Import Library> Add Library:
Search and add the following library:
Open Kinect for Processing
Let’s start with displaying some images from Kinect. Copy and run this code.
import org.openkinect.processing.*;
Kinect kinect;
void setup()
{
size(640,480);
kinect = new Kinect(this);
kinect.initDepth();
//kinect.initDevice();
}
void draw()
{
background(0);
PImage img = kinect.getDepthImage();
image(img, 0, 0);
}
It's nice to be able to screenshots of whatever you've got, so let's add a function to make an output image every time you click your mouse on the image.
Add this code under the draw function:
void mousePressed(){
save("kinectImage.png");
}
Your images will be saved under Sketch> Sketch Folder.
>> Displaying RGB Images from the Kinect. <<
Run the code below. You will be able to display video image and IR image and play around with grayscale images that is displayed on the right side.
import org.openkinect.freenect.*;
import org.openkinect.processing.*;
Kinect kinect;
float deg;
boolean ir = false;
boolean colorDepth = false;
boolean mirror = false;
void setup() {
size(1280, 520);
kinect = new Kinect(this);
kinect.initDepth();
kinect.initVideo();
//kinect.enableIR(ir);
kinect.enableColorDepth(colorDepth);
deg = kinect.getTilt();
// kinect.tilt(deg);
}
void draw() {
background(0);
image(kinect.getVideoImage(), 0, 0);
image(kinect.getDepthImage(), 640, 0);
fill(255);
text(
"Press 'i' to enable/disable between video image and IR image, " +
"Press 'c' to enable/disable between color depth and gray scale depth, " +
"Press 'm' to enable/diable mirror mode, "+
"UP and DOWN to tilt camera " +
"Framerate: " + int(frameRate), 10, 515);
}
void keyPressed() {
if (key == 'i') {
ir = !ir;
kinect.enableIR(ir);
} else if (key == 'c') {
colorDepth = !colorDepth;
kinect.enableColorDepth(colorDepth);
}else if(key == 'm'){
mirror = !mirror;
kinect.enableMirror(mirror);
} else if (key == CODED) {
if (keyCode == UP) {
deg++;
} else if (keyCode == DOWN) {
deg--;
}
deg = constrain(deg, 0, 30);
kinect.setTilt(deg);
}
}
void mousePressed(){
save("kinectImage.png");
}
Play around with the Kinect to product some creative images and save them. You will be able to see the saved files under sketch folder. You know the drill by now. ☺
Now Let’s take a look at some Point Cloud Processing.
What is a Point Cloud: A point cloud is a set of data points in some coordinate system.
In a three-dimensional coordinate system, these points are usually defined by X, Y, and Z coordinates, and often are intended to represent the external surface of an object.
Point clouds may be created by 3D scanners. These devices measure a large number of points on an object's surface, and often output a point cloud as a data file. The point cloud represents the set of points that the device has measured.
Run the code below. You will be able to display Point cloud images. You can play around with the parameters and check how the co-ordinates could vary the depth of the image displayed from the Kinect.
import org.openkinect.freenect.*;
import org.openkinect.processing.*;
// Kinect Library object
Kinect kinect;
// Angle for rotation
float a = 0;
// We'll use a lookup table so that we don't have to repeat the math over and over
float[] depthLookUp = new float[2048];
void setup() {
// Rendering in P3D
size(800, 600, P3D);
kinect = new Kinect(this);
kinect.initDepth();
// Lookup table for all possible depth values (0 - 2047)
for (int i = 0; i < depthLookUp.length; i++) {
depthLookUp[i] = rawDepthToMeters(i);
}
}
void draw() {
background(0);
// Get the raw depth as array of integers
int[] depth = kinect.getRawDepth();
// We're just going to calculate and draw every 4th pixel (equivalent of 160x120)
int skip = 4;
// Translate and rotate
translate(width/2, height/2, -50);
//rotateY(a);
// Nested for loop that initializes x and y pixels and, for those less than the
// maximum threshold and at every skiping point, the offset is caculated to map
// them on a plane instead of just a line
for (int x = 0; x < kinect.width; x += skip) {
for (int y = 0; y < kinect.height; y += skip) {
int offset = x + y*kinect.width;
// Convert kinect data to world xyz coordinate
int rawDepth = depth[offset];
PVector v = depthToWorld(x, y, rawDepth);
stroke(255);
pushMatrix();
// Scale up by 200
float factor = 200;
translate(v.x*factor, v.y*factor, factor-v.z*factor);
// Draw a point
point(0, 0);
popMatrix();
}
}
// Rotate
a += 0.015f;
}
// These functions come from: http://graphics.stanford.edu/~mdfisher/Kinect.html
float rawDepthToMeters(int depthValue) {
if (depthValue < 2047) {
return (float)(1.0 / ((double)(depthValue) * -0.0030711016 + 3.3309495161));
}
return 0.0f;
}
// Only needed to make sense of the ouput depth values from the kinect
PVector depthToWorld(int x, int y, int depthValue) {
final double fx_d = 1.0 / 5.9421434211923247e+02;
final double fy_d = 1.0 / 5.9104053696870778e+02;
final double cx_d = 3.3930780975300314e+02;
final double cy_d = 2.4273913761751615e+02;
// Drawing the result vector to give each point its three-dimensional space
PVector result = new PVector();
double depth = depthLookUp[depthValue];//rawDepthToMeters(depthValue);
result.x = (float)((x - cx_d) * depth * fx_d);
result.y = (float)((y - cy_d) * depth * fy_d);
result.z = (float)(depth);
return result;
}
void mousePressed(){
save("kinectImage.png");
}
HOW TO 3D SCAN WITH SKANECT
Hardware Requirements: Microsoft Kinect and Skanect Software
Platform: Recommended Mac: OS X 10.10, Macbook Pro 2012 or Macbook Air 2013.
Step 1: Download Skanect: http://skanect.occipital.com/download/
Note: Make sure to check the compatible version of Skanect for Mac OS X
Step 2: Extract the downloaded zip to the folder ‘Applications’
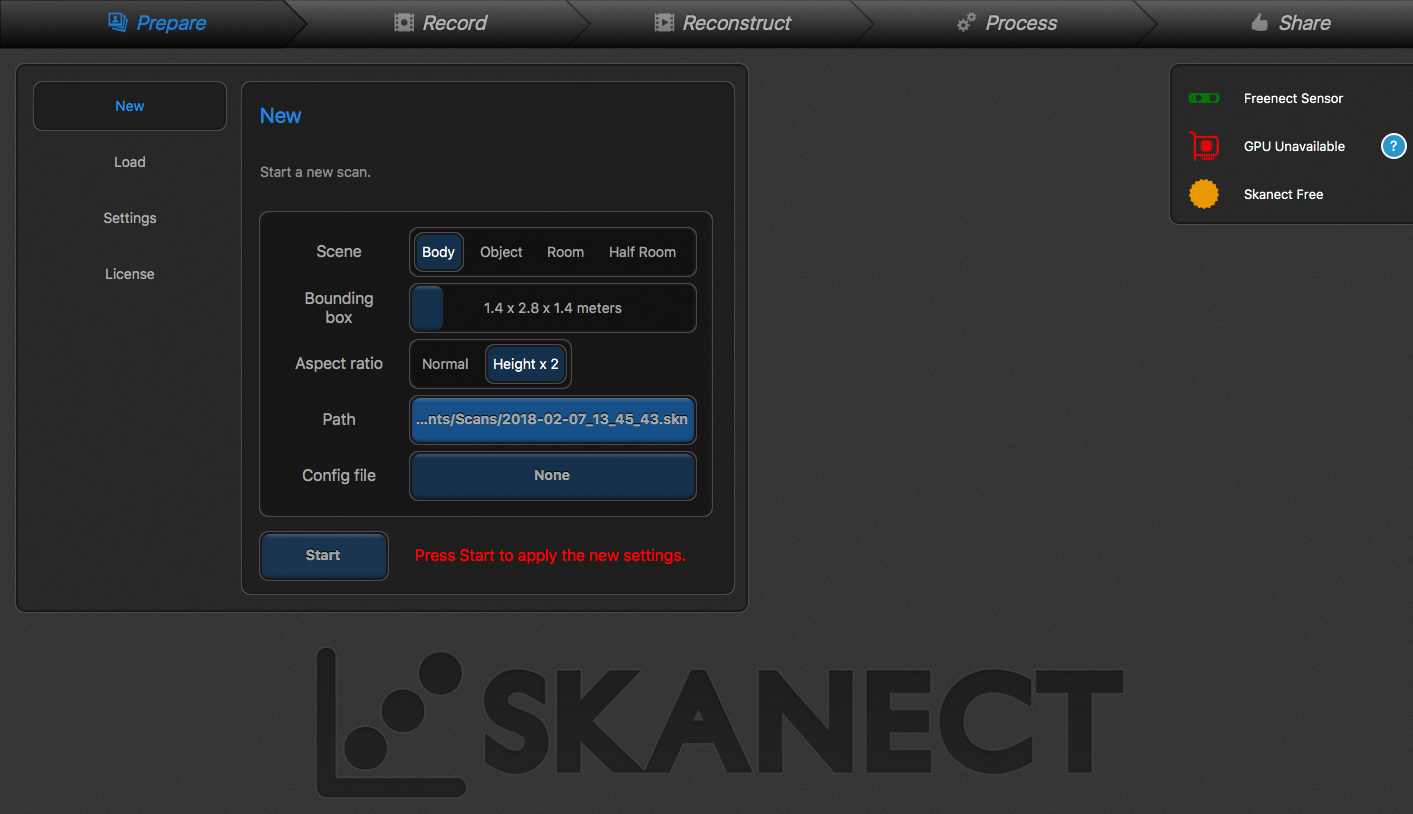
Step 3: Now let’s edit the software settings. Open Skanect / Go to NEW / Make sure your settings match those in the picture below:
Once the settings are uploaded, Press START.
Step 4: A screen will come up showing the bounding box in the middle. The infrared and video images are on the right.
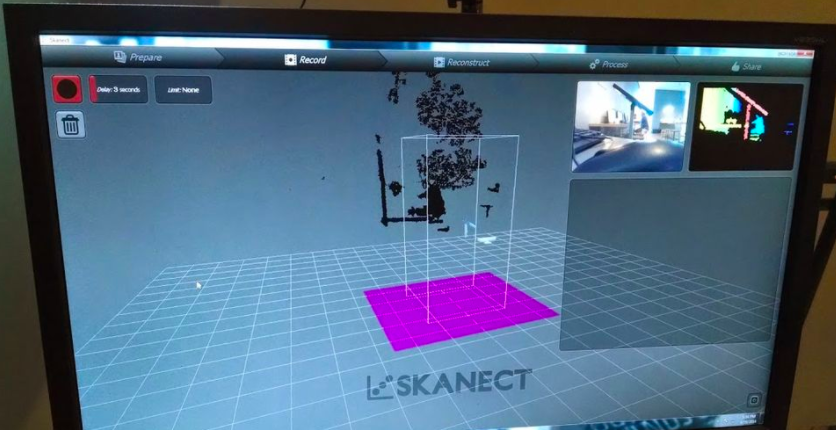
Tip: For the mesh to appear properly, make sure the lighting is consistent.
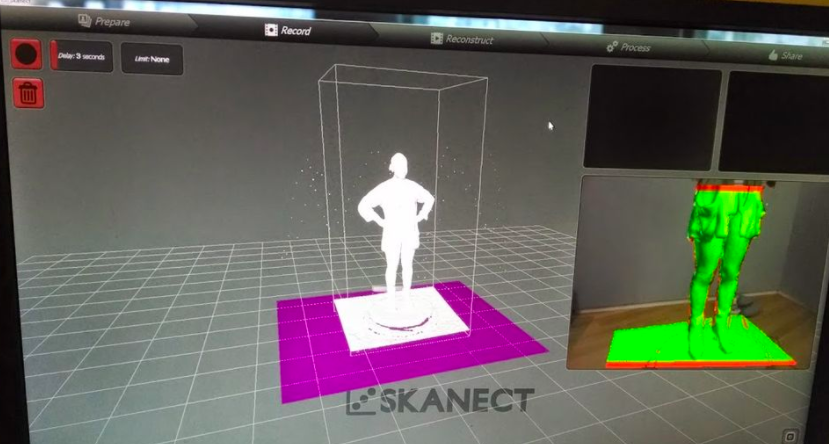
Step 5: Hold your Kinect up level with the subject's body. Press RECORD. The Kinect will begin recorded the depth (red) and the color (green). Make sure the subject’s depth is registered on the screen which should look something like this:

Important note:
As your subject is in motion, slowly move the Kinect in an up and down motion making sure to get the top of the head all the way to toe or however you want your final model to be. You can walk around your subject to register perspectives from every angle.
As you are scanning, be sure that you are getting a high frame rate around 18-24 frames. If you get below 18 you have to move your Kinect faster. You can monitor this by looking at the white numbers at the bottom of the screen. These numbers can also aid as a way of keeping your subject in alignment. If you keep the numbers in the center of your subject as you scan head to toe you can be sure your scan will be straight.
Step 6: Cleaning up your scan:
Once your subject has done a full rotation press the RECORD button in the top left corner again to stop the scan. Now that you have a full body scan you have to do some post processing to get it ready to print. First is making it watertight. Go to the PROCESS/WATERTIGHT option. Choose smoothing LOW and press RUN.
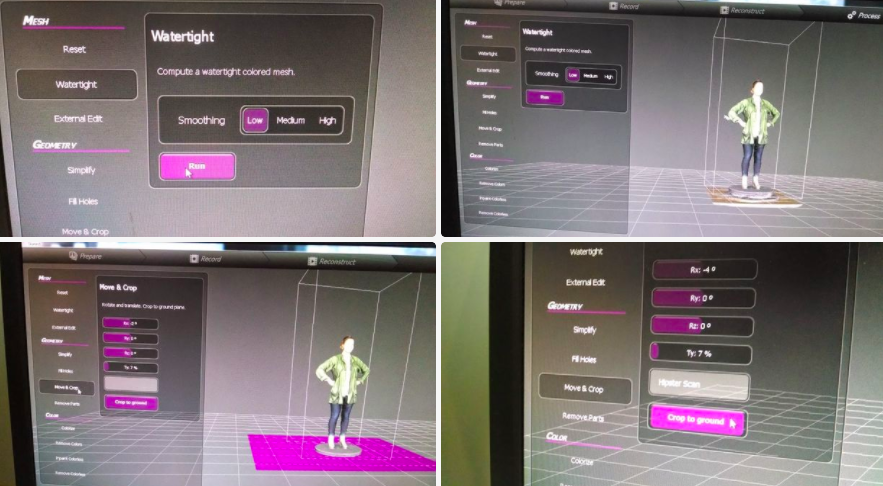
Now your scan will have color. But it may not be straight or have a flat base. Now we have to use the MOVE & CROP tools. Use the SLIDE BARS to adjust the X, Y, and Z axis of your scan to make it flat and straight. Make sure your base is parallel with the X Y plane as cropping will cut off anything below it to make a flat base. Type in the name of your file in the TEXT BOX. Press CROP TO GROUND.
Now, let’s begin exporting our 3D Model.
Step 7: Exporting Model
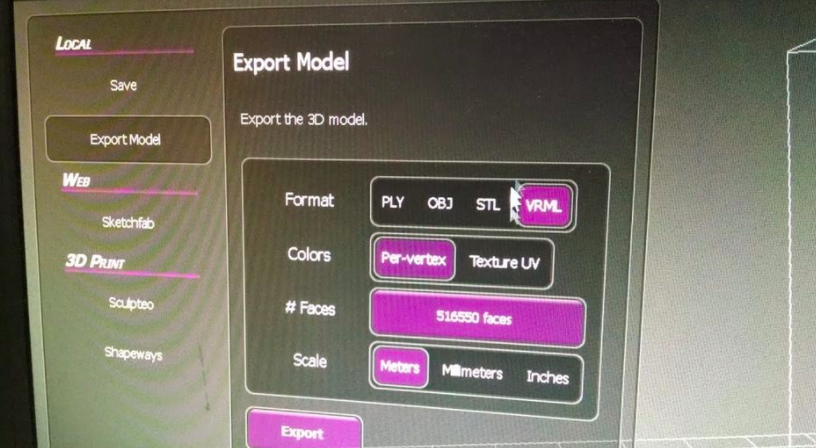
To export it to your laptop, go to SHARE and the export menu will open with a LOCAL option. Under LOCAL go to EXPORT MODEL and use the setting seen in the picture above to export for printing. It is important to choose VRML as the file type. This file type reads both shape and color. Click EXPORT and you are done! Now you can use that file to upload to a 3D printer of your choice.
If you wish to 3D print this model I suggest using SHAPEWAYS.COM and uploading it to be printed in FULL COLOR SANDSTONE.
The New School has 3D Printers available, if you wish to print your model, you may have to export your final model in OBJ or STL format (for TNS). Check this link for more information: http://resources.parsons.edu/labs/3d-print-lab/